

Table of Contents
ToggleCamper shell windows take a beating, UV rays crack the acrylic, seals fail, and visibility deteriorates faster than you’d expect. Whether you’re dealing with a single cloudy porthole or multiple windows that have lost their clarity, replacing them is more manageable than most DIYers think. This guide walks you through the entire process, from identifying what needs replacement to sealing and securing your new truck canopy window replacement properly. You don’t need a shop or specialized equipment: patience, the right tools, and about an afternoon per window are all it takes.
Key Takeaways
- Camper shell window replacement is a DIY-friendly project that requires basic tools, patience, and proper marine-grade sealant rather than specialized equipment.
- The most critical step in replacing camper shell windows is thorough prep work—removing old gaskets and cleaning the frame completely ensures new seals last 10–15 years instead of failing in months.
- Always loosen fasteners gradually in a crisscross pattern and use marine-grade silicone caulk for both the frame perimeter and exterior edges to prevent water leaks and extend window longevity.
- Common signs your camper shell windows need replacement include visible cracks, persistent water leaks, fogging that won’t clean off, and deteriorated gaskets or loose fasteners.
- Allow all sealants to cure fully (typically 24 hours for silicone) and test for leaks with a hose before the window is exposed to rain or high-pressure washing.
Understanding Camper Shell Windows and When to Replace Them
Camper shell windows serve two jobs: letting light in and keeping weather out. Most are fixed acrylic panes held in by a rubber gasket and fasteners around the frame. Over time, acrylic yellows, cracks, or becomes brittle. The rubber gasket hardens, shrinks, and stops sealing effectively. Water leaks follow, leading to rust, mold, and interior damage.
Signs your windows need replacement include:
- Visible cracks or crazing (fine cracks across the surface)
- Persistent water leaks inside the camper shell
- Fogging or cloudiness that won’t clean off
- Gasket deterioration, cracks, brittleness, or gaps
- Loose fasteners that keep coming undone
If you’re only dealing with a truck topper window replacement on one or two panes, you can tackle them individually. But, if multiple windows are failing, consider whether a full replacement kit makes sense economically. Most truck canopy window kits are designed to go in similarly, though specific fastener locations and gasket profiles vary by manufacturer. Check your camper shell’s documentation or reach out to the builder for exact specifications before ordering.
Tools and Materials You’ll Need
Tools:
- Socket set or wrenches (sizes vary by your camper shell, typically 8mm to 10mm)
- Screwdrivers (Phillips and flathead)
- Utility knife and fresh blades
- Pry bar (plastic or wood preferred to avoid marring)
- Caulking gun
- Stiff brush or old toothbrush
- Rags or paper towels
- Safety glasses and gloves
- Wire brush (optional, for stubborn gasket removal)
- Masking tape
Materials:
- Replacement window(s) sized to match your current aperture
- Rubber gasket or seal kit specific to your camper shell (comes with some windows, sold separately for others)
- Marine-grade silicone caulk or urethane sealant (not regular window caulk, it needs UV and moisture resistance)
- Automotive primer or adhesion promoter (if gasket won’t stick well on bare plastic)
- Mineral spirits or acetone (for cleaning old adhesive)
Before you order replacements, measure the opening and check your camper shell’s part number. Dimensions matter, and a window that’s a quarter-inch too large won’t fit without trimming the frame, a job best left to professionals.
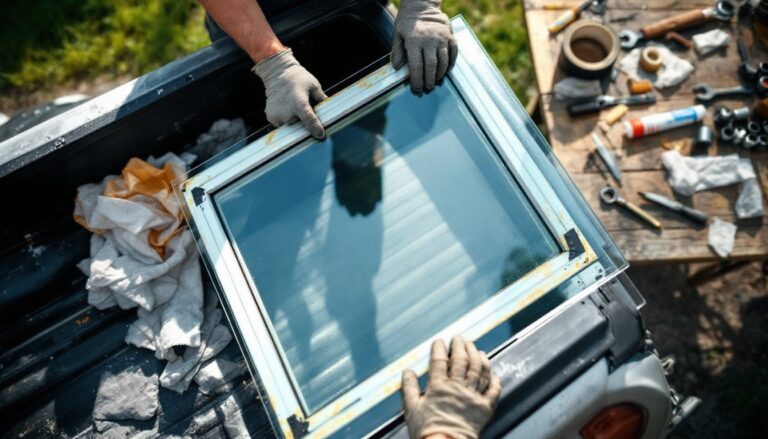
Removing the Old Window
Start by protecting the interior. If it’s raining or you’re working outdoors, cover the opening temporarily with a plastic sheet once the window is out.
Step 1: Loosen fasteners. Locate all bolts or screws holding the window frame. They’re typically on the underside of the frame or along the sides. Loosen them gradually, don’t pull one completely: go around and loosen all of them one turn at a time. This prevents the acrylic from cracking under uneven pressure.
Step 2: Remove the gasket. The rubber or foam gasket is your biggest challenge. It hardens after years of UV exposure and sticks stubbornly. Use a utility knife to cut it into smaller sections, then peel them away. Work slowly: rushing causes you to gouge the frame beneath. A wire brush helps dislodge stubborn bits. Heating the gasket slightly with a heat gun (on low) makes it more pliable.
Step 3: Clean the frame. Once the gasket is out, you’ll likely find old caulk, adhesive residue, or discolored sealant. Scrape these away with your utility knife or plastic pry bar. Wipe the frame clean with mineral spirits and a rag. Let it dry completely, this matters for the new gasket to seat properly. According to resources from Bob Vila, prep work is where most DIY window jobs win or fail.
Installing Your New Camper Shell Window
Preparing the Frame and Sealing
Before setting the new window, inspect the frame for cracks or warping. Minor cracks can be sealed with epoxy: major warping means you may need frame repairs before proceeding.
Apply a bead of marine-grade silicone caulk around the perimeter of the frame where the new gasket will sit. This creates a secondary water barrier. Use your caulking gun to lay a steady, thin line. Don’t overfill: excess caulk creates messy cleanup and weak seals.
If your new gasket isn’t pre-glued, apply adhesion promoter or primer to the frame according to the gasket manufacturer’s instructions. Let it cure as directed, usually 10–15 minutes. Then press the gasket into place, working your way around the frame to avoid trapping air bubbles. A handy neighbor tip: use your thumb or a rounded tool to ensure the gasket sits evenly.
Securing and Testing the New Window
Carefully lower the new window into the opening. Center it and hand-tighten the bolts or screws. Check alignment by stepping back and looking at the window from outside and inside, it should sit flush and square.
Tighten fasteners gradually, going around the frame in a crisscross pattern (top, bottom, left, right, then repeat) rather than tightening one side completely. This distributes clamping pressure evenly and prevents the acrylic from cracking. Tighten firmly but not aggressively: acrylic is strong but doesn’t like excessive torque.
Once secured, run a bead of marine-grade silicone around the outside perimeter where the frame meets the camper shell. This final seal prevents water from working its way in around the edges. Smooth it with a wet finger or caulk-finishing tool. As HomeAdvisor notes in their repair tutorials, good caulking is often the difference between a window that lasts five years and one that lasts fifteen.
Let all sealants cure fully before exposing the window to rain or high-pressure washing, typically 24 hours for silicone, longer for urethane. Check the product instructions. Once cured, test for leaks. Run a hose around the frame and check the interior for water. If you find drips, the gasket likely has a gap: reseal and retest.
For truck topper window replacement specifically, pay extra attention to how the gasket contacts the top edge. Water tends to pool there, and poor sealing causes the most leaks. If you’re replacing multiple windows, a systematic approach prevents mistakes: complete one fully, including cure time, before starting the next. This prevents confusion about which gaskets or fasteners belong to which opening.
Conclusion
Camper shell window replacement is straightforward once you understand the mechanics: remove old fasteners and gasket, clean thoroughly, seal the frame, install new glazing, and let it cure. The most common failure is rushing the prep work or using the wrong sealant. Marine-grade silicone isn’t glamorous, but it’s worth every penny when you’re not dealing with leaks six months later. Most DIYers complete this project successfully and save themselves significant labor costs. If you hit snags, a warped frame, fasteners that won’t budge, or persistent leaks, professional installers have the equipment and experience to troubleshoot efficiently.